Friday, August 30, 2013

Sometimes I'm the One Who Needs the Repair!

There is nothing I hate more than taking a picture that looks great on my camera's display only to find out it's a little bit blurry on the big screen. A little bit blurry = TRASH to me, even if it's the teensy tiniest bit. Now, don't get me wrong, I'm talking about where my subject is blurry, not bokeh.

So you're having issues with blur? See if this helps...

Decrease your ISO if possible
Anything over ISO 400 generally produces some kind of "noise".  The new sensors have greatly minimized noise over ISO 400, but it's still there. Try reducing your ISO to 100 or 200 and see how that works.


Check your shutter speed
If you're shooting by hand I don't recommend anything lower than 1/80.  Shutter speeds lower than that can make your shots blurry due to your hands being unsteady, your heartbeat, and/or your breathing. If you're using a zoom lens your shutter speed needs to the inverse of your focal length to minimize shake. For instance, if your focal length is 150mm your shutter speed needs to be at least 1/150. (1/240 if you're using a crop sensor Canon or 1/225 if you're using a crop sensor Nikon.)


Check your aperture
A wide open aperture greatly affects depth of field. If your aperture gets lower than f/2.2 your camera is getting a very specific point in focus but the depth of field is so narrow that some parts of what you want to be clear will be blurry. Simply use a smaller aperture setting until you get the result you want.  You may also need to adjust your shutter speed and/or ISO.

Use a tripod
Duh!


Buy reading glasses
I was shooting a wedding and every single one of my pictures looked blurry on the camera screen. I glanced down at my screen with my arm fully extended and the picture was in focus. That moment was when my farsightedness became apparent.


LASTLY...
Your camera MAY have a focus issue. If you're using a DSLR it can be an issue with your camera body OR a specific lens. Please follow your manufacturer's instructions on how to have your camera serviced.

 The reading glasses thing...yeah, that made me feel like I am getting older!

Thursday, August 29, 2013

Need a Black Backdrop in a Pinch? Try this...

I posted this picture on my personal Facebook account with the following question:

Where was this photo taken?
A - My living room with a black backdrop
B - In my driveway in the middle of the afternoon, no backdrop
C - Studio with black backdrop
D - In my driveway at night, no backdrop


Since most of my close friends know I don't have a brick and mortar studio they guessed either A or D. My photography contemporaries guessed A, C (Sometimes I use someone else's studio), or D.  I'd say D was the most chosen answer.  The correct answer, however, is B.

The picture was taken at around 2pm on a sunny day while standing on my driveway. You are seeing the photo as it was taken with the exception of a slight crop. Don't believe me? Let me tell you how I did it!!!!!! NOTE: Depending on the time of day speedlights may/may not work.
  • Step #1 - Place camera in manual, or "M" mode.
  • Step #2 - Set shutter speed to 1/250. Why? Because you're likely to run into flash sync issues if you use a flash at higher shutter speeds.
  • Step #3 - Set your aperture very small, like f/20. This photo was taken at f/32.
  • Step #4 - Set your ISO to 100.
  • Step #5 - Take a picture without your subject. If the picture is not completely black you will need to make some adjustments. The first adjustment to make is make your aperture narrower.  If that doesn't work then increase your shutter speed, but just barely.  After this is done you should have achieved the completely black photo.
  • Step #6 - Place your subject where you want them.
  • Step #7 - Place your strobe (I used an Alien Bee B800 at full power) where necessary and make the light as narrow as possible. I used a cone, but you can used an unextended umbrella to help direct the light only on your subject. You'll want to do this so the light won't reflect off the ground or any object in the background.
  • Step #8 - Take your picture. It should be ready to go right out of the camera!

In the photo above I had to increase my shutter speed to 1/400. The telltale sign of a flash sync issue is a dark band of varying sizes along the bottom of the picture. Remember earlier I said the only edit I made was a small crop? The crop was to get rid of that dark band. Other than that, the photo is what I took right out of the camera, no edit!


This same concept will work indoors, too. Light direction and focus will be even more important, however.

I hope this little trick comes in handy if you ever wish you had a black back drop. Personally, I think it's quite cool...

Wednesday, August 28, 2013

Bokeh - Yeah, It's a Weird Word

Pronounced BOW-kuh...it's a weird word to say. It was a weird word to hear the first time I heard it. I remember acting like I knew what it meant, excusing myself to go to the men's room, pulling out my phone, and doing a Google search for it. When I read the definition I knew EXACTLY what it was, I just didn't know it had a name. I just thought it was "blur."  I was only half right.

Bokeh used to subtly convey what subject is doing.
According to Wikipedia, "bokeh" is "aesthetic quality of the blur in out-of-focus areas of an image." So, it's not just the blur, but how good the blur looks. Another way to put it...all bokeh is blur, but not all blur is bokeh. Bokeh enhances a photos appeal and is more engaging to the viewer, whereas plain ol' blur might just be a poorly taken picture.


Bokeh used to make unsightly background more appealing.
Bokeh isn't something that just happens unless you don't know what you're doing. It's something very intentional. Take the photo above for example. @justlarry LOVES Memphis, TN. We were on a shoot together and he picked up a copy of Memphis magazine. While I wanted Larry to be the primary focus of my photo, I wanted his love of Memphis to be the secondary focus. And his red nose to be the tertiary focus (Ha!).  Bokeh can also be used to blur out ugly backgrounds. That might not sound like "bokeh" as the background is ugly, but remember, bokeh is the aesthetic quality of the blur, NOT what is actually blurred. You can literally take something unsightly and use it to your advantage.


By now you're probably wondering how you can make this happen intentionally...well that's what I'm here for. Take notes...or bookmark this page!

Before I move on I feel I must also touch on "depth of field." Depth of field is the area of the photograph that is in focus. It's affected mainly by two things...focal length (effective length of the lens) and aperture setting. The lower the number (the more open the aperture) the narrower the depth of field.  Combining a long focal length with a wide aperture can give you the narrowest depth of field with a lot of blur. A short focal length with a small aperture will cause just about the entire photo to be in focus. Ok, moving on...

If you're using a point-and-shoot:
I'm not going to lie, you're going to be a little limited here. However, it's not impossible to pull off. You'll want to zoom in as far as your lens will go (maximum focal length) and NOT use digital zoom. Focus on your subject and take the picture. If the blur is not where you want it, try setting your camera to it's macro setting. If that doesn't work look to see if your camera has an "aperture priority" setting. It's "Av" on Canon models and "A" on Nikons. Once you set your camera to aperture priority you'll want to open the aperture as wide as you can, which will mean a small f/number. Start of with an ISO of 200 and shutter speed of 1/80 if you're indoors. Adjust settings to taste. You're just simply going to have to play around with your settings, but it CAN be done.

If you're using a DSLR:
  • Shoot in manual mode.
  • Use maximum zoom. (If using a prime lens, this won't be an option.)
  • Set aperture to wide setting that will allow for a good depth of field. For instance, if you're using a 50mm, f/1.4 lens, setting the aperture to 1.4 might make someone's nose in focus but the eyes will be blurry. Take multiple shots and tweak your settings.
  • If you are still not getting the desired effect, try moving closer to your subject if possible. Longer focal lengths at short distances will create a greater blur.
  • Pay attention to ISO. I can't help you much here...you're going to have to play with it based on your available light.
That's really about it. You're going to have to experiment. Eventually, it will all click and you'll be able to pull off the desired results whenever you want.

If you have any questions about bokeh, or any other photography/video topic, please e-mail me at ande@geminimm.com.

Remember, you'll smile when I flash you!

Monday, August 26, 2013

Know Thy Product

So you've taken the plunge and decided it is time to start making some money from your photography skills.  Maybe you've just started selling because people have told you, "You need to start a business!"   Maybe you've been in business for years and are making a decent living from it.  No matter what your skill level, one thing that separates photography businesses from each other is their knowledge exactly what they are providing to their clients as their end product.

For many people, when they start their business, they are overwhelmed by the insurmountable quantity of photography products available.  You can get prints and books in any size
from wallets to 96" and beyond, black and white, color, matte finish, glossy finish, metallic pearl, thick stock, thin stock, true chemical process, giclee, dye sublimation, and countless other options.  That's just the paper items.  You can get canvas, metal, acrylic, wood, stone, ceramic, and a myriad of other medias.  You can get key chains, sports tickets, posters, memory mates, etc ... I think you get the point.   There are literally thousands of photography products you can offer your client, and you want to offer them all!   Well, you can't.

If you were to try and offer every product on the market to your client, you would overwhelm and confuse them to the point they would simply not buy anything.  Determine your standard product line, and keep it simple by choosing a handful of labs to do business with.   I have three labs that I work with:  One for sports products, one for all other photo print products, and one for all my albums and books.  I have accounts with other labs and on occasion I may need to order a specialty item from them, but on the whole I use three primary color labs.  As a result, I have a very specific product line.

Know Your Price Per Sheet
One of the most common questions you will be asked is, "How much for ...?"  People will ask you to quote a price for some random set of prints, No matter how well you think your print packages are assembled to cover everyone's needs, people want something different.   It's like going to a restaurant and ordering from the menu, then asking for substitutions and changes. 
The server always says, "Yes, we can do that."  There may be a fee, but they never say no.  It's good business sense:  If the customer is willing to pay for it, give them whatever they want within reasonable expectations.  Know your price per sheet, and how many prints of what size make up a sheet.  If a client asks "How much for (3) 8x10's and (6) 5x7's?   Oh, and some wallets?" you need to be able to answer immediately.  You never want to be forced to tell a client, "I'll check that and email you tonight."

In the example above, let's assume you charge $20 per sheet.  Each 8x10 is one sheet, every two 5x7's make up a sheet, and eight wallets make up a sheet.   So we have a total of seven sheets, at $20 each for a grand total of $140 retail price.  You can immediately tell them, "That would be $140 a-la-carte, but I'm sure we can bundle something together for you."   Now your dialog is open and you can discuss the details with the client and negotiate a photo package for their session and prints.  Once you walk away without providing an immediate answer, that client is gone.  Close the sale!

Know Your Discounts
Discounts, we love them and so do your clients.  As a society we have been trained to bundle products and save money.  We all know it's cheaper to order the burger, fries, and drink as a combo rather than as individual items.  It may only save us $0.25, but we all buy the drink to get the discount.  Your business is the same way.  Your clients expect a discount if they buy multiple items together.  Use that to your advantage!  Make sure they know the old sales mantra, "The more you buy, the more you save!"

In our example using the cost per sheet, those are retail prices, and we all know that nobody ever pays retail.  What kind of discounts you offer?   Do you offer a standing discount to Fire / Police / Military?   I do.  Do you offer a standing discount that saves you a certain percentage if you spend $XXX amount?   I do.  Do you offer a loyalty discount for your best returning customers?  I do, and you should to!  One of the best discounts you can offer on speculative sales jobs is the early-bird discount.   Whenever I do a spec sales shoot, I offer a 15% discount if you buy within the first 48 hours.  You want impulse buys.  If they can save money now, they will buy now.   Once they have looked at the photos and walked away, they're gone.  Close the sale!

Know What Sells
You've got to know your market, and what sells.   In early 2013, the wooden prints were a huge product ... for about six months.  By the time you figured out they were selling and found a lab to do them, the craze was over.  Even when you found a place to produce them for you, they sold to everyone ... including your clients.  You had to buy at retail and mark it up higher.  High cost and being late to the game means  your sales were dismal.  Know what sells at the core of your business.

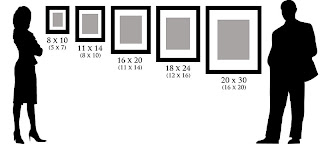
Here's a list of 20 items I suggest you carry as part of your core product line:

  • Photo Prints
    • 4x6
    • 5x7
    • 8x10
    • 11x14
    • 16x20


  • Canvas Sizes
    • 10x10
    • 12x12
    • 11x14
    • 16x20
    • 20x30
  • Announcement Cards
    • Birth Announcements
    • Graduation Announcements
    • Wedding Invitations / Save The Date Cards
  • Albums
    • 8x10 / 8x12
    • 12x18
    • 6x9
    • Paperback "Pocket Book" sized duplicates
  • High End Wall Art
    • Metal
    • Acrylic
    • Shaped Pieces

Train Your Staff 
If you're lucky enough to have a staff working with you, especially at events where you are either selling product directly on site, or pre-selling packages such as Team / Individual photos for a sports league, make sure that your staff knows your products.  If you're busy photographing 300 baseball players, you rely on your staff to handle all the paperwork, payments, and questions from the parents and coaches.  The parents have the price sheet and order form, but they still have questions, "Can we substitute this for that?" or "What if I buy two of these, can I get a discount?"   Make sure the table staff knows the answers!

If you're even more lucky, and have other photographers working for you. Make sure they can answer the questions, too!  Even if you're just a one-person company, having a staff gives a much larger presence.  When someone asks your 2nd shooter a question, they need to be able to answer it.  You don't want your photographer sending every person with a question over to see you.  Not only does it make your brand appear unprofessional, it takes time away from you.  If you're answering questions, you're not taking pictures, and pictures are where you make your money.  Train and empower your staff to close the sale!

Hopefully you have been encouraged to review your product line, trim the excess, and come up with a core group of end product you can present to your client.  Know what you offer; know your pricing; and know what options are available.  Be able to answer any question immediately, without hesitation.  You are your own brand, and with everyone who owns a DSLR claiming to be a photographer, you must present your brand better and more professionally.

Sunday, August 25, 2013

Indoor Lighting on a Budget

Over the weekend an Awesomeographist reader asked me to touch on indoor lighting because the holidays are coming up and family members ask her to take pictures. Her frustration is that she has to work around the time of day. Thanks for the question, Melissa...here's your answer!


Speedlight (Preferred Option)
While not a "budget" item, a speedlight will solve most indoor lighting needs for the holidays and will be well worth the money spent.  The speedlight pictured is for the Canon line and is priced at around $299. Nikon has it's own line, as do other camera manufacturers. There are also third party solutions you can look at, too. I would not point the flash directly at your subject. I would (90% of the time) point the flash straight up, then attach a business card to the back of the flash with a rubber band. It will bounce most of the flash off of the ceiling to illuminate the room and bounce just enough toward your subject to provide some fill. (See photo to the right)


Work light
This is what I started with when I began to learn studio lighting. It doesn't flash, but provides a very bright light that can greatly improve your ability to take indoor photos. The two main pros...you can usually find these at Lowe's, The Home Depot, Walmart, etc. for around $40 and they are very bright. The main cons are they are pretty unsightly, they will take up space, and get VERY VERY HOT!  If you buy one of these you're going to have to pay attention to shadows on the face as there's a good chance you'll be placing this light to one side of your subject.


Handheld LED
If you have an assistant, or just someone who can hold a flashlight for you, this is a good solutions. These LED "wands" put out a substantial amount of light, have rechargeable batteries (more often than not) and are very portable.  The cons...white balance will probably need to be corrected when you edit as these tend to emit a blueish light and, as I said earlier, you'll more than likely need someone to hold this for you.


Available Lights in the Room
You may have enough lights already.  Turn on every light in the room that you can. Ceiling lights, lamps, nightlights, EVERYTHING.  Since you will more than likely be shooting with a wide open aperture and a slow shutter speed you'll need to make sure you minimize the visibility of these lights in your photos as they will be blown-out (over exposed) like crazy...but they can definitely be used to your advantage.


Windows
An old standby! Open the curtains, pull the blinds up, and shoot away...but make sure the windows are behind you and not your subject.


Camera settings
This is where the knowledge of your camera will come into play. Your knowledge of ISO, aperture, shutter speed, and focal length will be invaluable!  If your light is limited I'd start off with ISO 400, a slow-ish shutter speed around 1/60 (you'll need a tripod), an aperture as wide as possible (most kit lenses will open to f/3.5) and I'd try the longest focal length possible up to around 60mm.  Those are starting points, then you'll need to adjust from there. If the picture is still too dark, bump the ISO up to 800, but I wouldn't go much higher than that. Still too dark? Reduce your shutter speed to 1/30.  If those don't work you may want to consider moving to where there is more ambient light and start all over again with your settings. (See "6 Ways You Can Improve Your Photography")

Lastly, Melissa...sometimes we all have to give in and work around the time of day. It's just a fact of life for a photographer!  ;-)

If you have a question or suggestion for The Awesomeographist blog please submit it to ande@geminimm.com.


Week of 8/26

I'm wrapping up a somewhat relaxing weekend and wanted to let you know what this week holds for The Awesomeographist blog. Titles are subject to change...
  • Indoor Lighting on a Budget
  • Guest post by Roger Cotton
  • Lens Selection
  • Bokeh - More Than Just a Blur
  • Weekend Photo Challenge
I hope there's something there you'll enjoy! If not, respond and let me know a photo/video topic you'd like me to address. I'll be happy to write about it!

Friday, August 23, 2013

Camera Bag "Extras"

Making the leap from amateur/hobbyist videographer/photographer to professional was scary. Forget the city/county licenses, having to keep up with expenses, new taxes to pay, and the honing of sales/marketing techniques...those things are par for the course. You can do an Internet search on starting a photography business and get that information in under five minutes.

There's also a certain level of stress that goes along with what to pack in a camera bag.  Every photographer knows (or SHOULD know) to include/carry a backup camera, lenses, lens cleaning kit, extra batteries for all battery operated equipment (seriously, I carry enough battery power to shoot for 48 - 72 hours without recharging), extra memory cards, and a flashlight. That list is basic (I'll call it the "DUH! List") and you can find that list on just about any site dedicated to photography and starting a photography business.  However, there are items that are often overlooked that need to be included, and that's what I'm here for!

What are some of these items you ask? Well keep reading!

Bottle of Water/Snack
It is VERY important to stay hydrated and full during your shoot. If you shoot for any length of time you know the fatigue that accompanies carrying heavy equipment around while chasing your clients or standing outside in hot weather. That fatigue feeling gets exponentially worse if your hungry and or thirsty. Do yourself a favor and buy a nice water bottle that can be attached to your backpack camera bag (oh yeah, I highly recommend that kind of camera bag) with a carabiner. My choice here is the Thermos Hydration Bottle with Meter. The reason I like this bottle is the seal is superior (no leaking), there is a narrow opening to drink from (no straw and no wide lip), is around $10 and can be purchased just about anywhere.  If you get tired of plain water, you can also add a mix to it for extra flavor.

Along with the water, you need to pack a small snack. Being hot, sweaty, tired, thirsty AND hungry really really sucks. The snack should be something dense and compact, and hopefully something that isn't sensitive to hot temperatures. I'd recommend a pack or two of trail mix, which you can make on your own or buy. If you're shooting indoors, some type of meal replacement bar is going to be your best bet. I prefer Zone Perfect bars for this particular situation because they are small and quite tasty. They are NOT my preference for meal replacement while weight training, but hey...this is a photography blog!

I cannot how many times I've had to mentally push through because I hadn't packed water and a snack or two. A couple of times I really thought I was going to pass out. These two items don't take up much space and are easy to carry.

Business Cards
This item SHOULD be on the DUH! List, but it's amazing how many professionals don't carry business cards with them. It happens more often than not that a guest of a client or the attendee of an event will see you taking pictures and want a card for a personal shoot or a corporate event. I love those because they are easy to convert from a lead to a sale. If you don't have business cards order some TODAY!!!!! If you have them and aren't packing them, stop reading right now and put some in your bag so they will be ready for your next shoot.

Muscle Cream and/or Pain Relievers
Let's face it...camera equipment is heavy. I'm a pretty strong guy, but even after a couple of hours of carrying my cameras I develop aches and pains. A nice ODOR FREE muscle rub is good to have in your bag. I prefer BENGAY Vanishing Scent Gel. I know I said odor free, but the scent actually helps you know you've pinpointed the gel over your sore muscles, then it goes away. It won't be offensive to you clients in the least.

 Ibuprofen is my pain reliever of choice. It helps when I get "trigger finger" from holding my camera with too tight of a grip while pressing the shutter release button. It also helps when I bang my hand or knee against something and don't have room for downtime. It also helps with my knee arthritis, as do the support braces I'll discuss later.


Miniature Notebook
And a pen. Why is this important? If someone asks you for a business card I always tell them I'll trade them a card for their name, number, and e-mail. I do this because the chances of me following up with them are greater than them following up with me. The notebook can also be good to jot down the names of people in specific shots.


Support Braces - For knees, elbows, wrists, etc.
Yeah, I have arthritis in my knees. Bad. My orthopedist says my 41 year old knees should belong to someone who is over 50. To put it simply...they hurt. Now, I don't need my knee braces until I've been walking around quite a bit. When my knees start to hurt I can get them out of my bag, quickly put them on, and keep going. I get instant pain relief from them. The pain doesn't completely go away, but it goes away to the point to where it no longer bothers me.

That's my list of non-traditional camera bag items. Do you have items you keep in your camera bag that don't directly have to do with the operation of your camera? Please share them...who knows who you might help!

Keep up with Gemini Multimedia!
Facebook: facebook.com/geminimm
Flickr: flickr.com/geminimultimedia
Instagram: geminimm
Twitter: @geminimm
Youtube: youtube.com/geminimultimedia


Thursday, August 22, 2013

When Photography Gets a Little "Looney"

As you've probably gathered from my previous posts, I'm a proponent of getting to know your camera, learning about photography, and applying what you've learned to make great pictures.  It's not something any of us are born with, so we have to learn it from somewhere.  My hope is that this blog is one of those places for you!

Paying attention to your camera's automatic settings and tweaking them after that is a good way to learn. There are also some "rules" that, once learned, will help save time when taking pictures.  If you're shooting outdoors there are two rules you should know.

The "Sunny 16" Rule - This rule is a way to estimate proper exposure on a sunny day. Start off by setting your camera's aperture to f/16. If you are shooting with a film speed of ISO100, then your shutter speed needs to be the inverse of the ISO, or 1/100. If you're shooting at ISO400 (shooting sports, for instance) your shutter speed needs to be set at 1/400.  The focal length (zoom) you are using will have an impact on your settings.  The chart below is a good reference:


Aperture Lighting Conditions Shadow Detail
f/22 Snow/Sand Dark with sharp edges
f/16 Sunny Distinct
f/11 Slight Overcast Soft around edges
f/8 Overcast Barely visible
f/5.6 Heavy Overcast No shadows
f/4 Open Shade/Sunset No shadows
Add One Stop Backlighting n/a


The "Sunny 16" rule is meant to be used on subjects that are front lit by the sun. Pay close attention to the last line of the chart for subjects that are backlit.  Remember, this rule is an estimate. You may need to "mix to taste" to make sure the picture looks how YOU want it to look.


Now, this is where things get a little "looney"...

The "Looney 11" Rule  - This rule is very similar to the "Sunny 16" rule, except it is applied at night and you apply it to photographing the surface of a FULL moon ("Looney" is a play on the word "Lunar").  Instead of setting your aperture at f/16 you set it and f/11 and do the same thing. If you're using ISO100 you set your shutter speed to 1/100, ISO400 will dictate a shutter speed of 1/400.  The chart below shows the initial settings for different moon phases. My photo to the right was shot using f/11, ISO100, 1/125 shutter speed, at 200mm.

Moon Phase Exposure
Full Moon 1/250th sec at f/11 at ISO 250
Gibbous Moon 1/125th sec at f/11 at ISO 250
Quarter Moon 1/60th sec at f/11 at ISO 250
Wide Crescent 1/30th sec at f/11 at ISO 250
Thin Crescent 1/15th sec at f/11 at ISO 250

Focal length will play a more important role using the "Looney 11" rule, so tweaking your settings will be crucial.  Also, when using long focal lengths, a tripod will become more of a necessity as camera shake will be more evident if your camera is hand-held.

Like the "Sunny 16" rule, the "Looney 11" rule is an estimate only. You will more than likely have to make small adjustments, but the immediate improvement in the quality of your moon pictures should make knowing this rule well worth it.

Lastly, you know those "Harvest Moons" that look so big and beautiful in the sky? Well, if you take a picture of them expecting to see a moon that is larger than normal in your photo, you will be disappointed. It's called the "Moon Illusion" and you can watch this short, entertaining video to learn more about it.
 

So that's it. Two rules to start off with for outdoor photography. Give it a shot and let me know how it goes!


Wednesday, August 21, 2013

Have a Family Memory Night!

Remember slide projectors?

One of my favorite things to do as a child was to watch my dad pull out his slide projector, set up the screen, turn out the lights, and eat popcorn my mom made in the skillet.  I LOVED sitting on the couch with my mom while my dad advanced the slides. There was no music to interrupt the conversation my parents had about each photo. Most of the slides were from before I was born, or they were from a time I was so young I couldn't remember. I also vividly remember the sound of the slide projector advancing to the next picture and smell that would fill the room from the projector's bulb heating up.  While I believe the days of the slide projector are long gone, the days of the slide show are not.

I hope you have memories like this from your youth. Whether you do or not, why not make memories like this with the family you have now? Even if you didn't have nights like this growing up, you can still start a tradition now!


If you're still reading this post, you are at least entertaining the idea of a family memory night. Good. Let me give you some ideas.
  1. If your family likes popcorn, learn how to pop it using a skillet or an old fashioned popcorn popper. It doesn't have all the junk in it (not saying it's healthy) and it just tastes better. Don't get hung up on this...use microwave popcorn if you prefer. The goal is to spend family time together. Eat Rotel and tortilla chips for all I care! Here is a recipe for popcorn:
  2.  Find your old slides and pictures.  You can actually sit at the kitchen table and go through the pictures together, or you can scan them (a must for the slides unless you have a projector) and watch them on your computer, phone, tablet, etc. You can even burn them to a DVD/Blu-ray and watch them on a large screen. REMEMBER: If you're going to physically handle the photos make sure all of the grease from the popcorn has been wiped off your hands!!!!!!
  3. Find your old 8mm reels and convert them to DVD/Blu-ray. They are fun to watch, but after years of storage there's a good chance they are a little brittle and will break IF you have a projector (that works) to show them on.
  4. Find your VHS/Beta/and home movie tapes and convert them to DVD/Blu-ray. I bet you don't own a Beta player. I'm pretty sure you don't have a VHS player. And there's a good chance you can no longer play your camcorder tapes.
Gemini Multimedia can assist you in transferring all of the above to a digital format. What we cannot do is assist you in making the popcorn unless you want to burn your house down! And while we'd love to help you get your analog media transferred to a digital format, there are plenty of places that can do that for you. Just do it! (Please)

I really hope you plan and follow through with a family memory night. I think you'll be surprised at how much fun it can be!!!!!

For additional help planning your night feel free to contact me at (901) 213-7890 or e-mail at ande@geminimm.com.

Tuesday, August 20, 2013

"That's a Great Photo! You Must Have a Nice Camera!" (UGH!)


Ok ok ok...I DO have a nice camera! I have nice equipment in general. I have a nice video camera, I have nice speedlights (flashes), I have nice studio lights, I have nice cameras. My equipment bags...eh, I probably need new ones, but yes...they are nice, too!  It is not the most advanced equipment, but it most definitely is nice. However...

It's a not the camera...it's me. I know how to expertly use every single piece of photo/video equipment I own. I have spent money and time learning the intimate details of my camera. I've shut myself in my closet and changed the settings with all the lights turned out. Saying a picture I took is the result of my "nice"camera is like saying:

"Wow! That's a beautiful painting! You have nice brushes!"
"Yum! This soup is EXCELLENT! You have a nice pot!"
"What a beautiful new bar you've built! I tell ya...those are some nice saws you have!"
"That's a great haircut! Your stylist must have great scissors!"
"What a beautiful brochure! Your printer is so awesome!"

That being said, my point is not so much to gripe, but to let you know that you don't need to have the "best" or "most expensive" equipment to take great pictures. You don't even need to be a photographer! You just need to know the details about HOW your equipment works. The more you know, the better you'll be.

So...what are some ways to get to know your camera better? Well...I'm glad you asked!


  • Find a mentor. (See "The FIRST Step To Becoming A Professional Photographer Is...")
  • Read the user guide that came with your camera and keep it in your camera bag. If you don't have a camera bag, get one. Like NOW!
  • Buy another, more in depth book about your camera. I LOVE the "...for Dummies" books.
  • Put your camera in full automatic mode and PAY ATTENTION to the settings in different environments. Then play around with those settings in manual mode and see what happens.
  • Go into a closet, turn the lights out, and try to make setting adjustments in the dark. Sure, you might be able to see the screen, but will you know where all of the buttons/knobs are when you need them?
  • You'll also want to learn how to process photos using editing software.  I use Lightroom ($149) and Serif PhotoPlus X6 ($89).
  • Lastly...PRACTICE PRACTICE PRACTICE!!!!! Take your dog to the park. Take your kids to the zoo. Take your wife out to dinner. Then take pictures. Lots of pictures.
  • Do you have a speedlight?   Do the same thing with it!
The goal is to increase your knowledge of your camera so you do not have to rely on your camera's automatic settings. Once you get to be an expert with your camera the quality of your photos will improve!

Then people will tell YOU what a nice camera YOU have!  ;-)

If you have any questions or have an event you'd like to hire a photographer/videographer for, send an e-mail to ande@geminimm.com or call (901) 213-7890.

"You'll smile when I flash you!"

Monday, August 19, 2013

ANDe's Top 5 Places to Shoot In the Memphis Area

I love, love, love shooting outdoors! (I love shooting in studio, too!)

Something about the fresh air and freedom. I spent years tethered to a desk and always thought there's got to be more to "making a living" than just sitting there working on projects or waiting on the phone to ring. I thought sales would be a good way to break the monotony, and it was. But when I decided to make a business out of my photography habit...I had no idea how much I'd enjoy it. Sales + being outdoors = a very happy ANDe!

Since I love shooting outdoors I thought I'd share my favorite outdoor locations to shoot. I have a super secret location that only a few people know about, but other than that...here's my list in alphabetical order!

Collierville Town Square
Located about 15 minutes east of Memphis, this historic area of Collierville is beautiful any time of the year. It's deceptively diverse. If you want the "old towne" feel, simply take pics with the town square shops in the background. Want an urban feel? Walk behind the shops and snap away in the alley. The town square park is seasonally decorated and is absolutely beautiful when decorated for Fall and Christmas. Want to take railroad pics? There is a parked locomotive, box cars, and a caboose on the square. There is also a section of "dead" track that is safe to take pictures on. Not far from the dead track there is an active track. I don't recommend taking pics on the active track, but when a train goes by you can get some cool motion blur effects for the background.


Downtown Memphis
Great urban setting! You have the riverfront with three distinct settings...Harbor Town, Cobblestones, and Tom Lee Park. All three being great locations for unique pictures. There are numerous streets and alleys to provide your standard urban setting with the unique feel of Memphis, and let's not forget Beale Street, for one of the most unique feels you can get in the United States!


Oaklawn Gardens
Probably one of the most photogenically diverse locations in Germantown, but if you blink you'll miss it. I'm not saying it's a small location, it's not. It's quite large. It just doesn't stand out while your driving down the road and you need to be aware that you're looking for it. I can't describe this place in the short amount of time and space I have here, so so click the link above for more information...I HIGHLY recommend this location!


Overton Park
Centrally located in Memphis, Overton Park is neatly sandwiched between the Brooks Museum of Art and the Memphis Zoo, both of which are very photogenic locations themselves! If you want a wide open space to take pics, you'll have it here. If you want some unique architecture as a prop/backdrop, you'll have it here. There is BEAUTIFUL foliage here year round. If you want to take pictures of your family (or someone else's) this is a great choice!


Shelby Farms
Quite possibly my favorite outdoor location. However, wear your tennis shoes...you'll do some walking. If you want a diverse natural environment, you'll not find a better place in Memphis! You have lakes, huge trees, open fields, vines (be careful of the poison ivy!), nature trails, playgrounds, and just about any other park type feature you want!


Give these places a shot! I promise you won't be disappointed!

Do you have an outdoor location you prefer in the Memphis area? Please feel free to comment here!


Friday, August 16, 2013

Stop-Action Photography: A Love Story

I LOVE taking stop-action photography! LOVE LOVE LOVE IT!!!!!

The Athenian Dancers
Memphis, TN
Why do I love it? I love it because it's a way to freeze a moment that happens in literally the blink of an eye.  My first personal experience with it was when I played little league baseball. A parent of one of my teammates had purchase a Canon SureShot 35mm point-and-shoot camera. They had taken pictures of my team playing ball on one Saturday and brought them for us to look at the next. (Back then it was all film and the film had to be developed. A three day turn around time was normal, two days was fast, overnight was unheard of and one hour...WHAT?????) This parent had taken a picture of me at the plate, mid-swing, with the ball just inches from the bat, and thus a fraction of a second from being smashed deep into center field!  ;-)

Anyway, that picture had an impact on me and definitely affected my style. It's one of the "things" I'm known for. Here's how I do it:

  1. If taking photos of a sporting event, arrive early while teams are warming up. This way you can take some test shots and get your timing down.
  2. Find the best location that:
  3. AR-15 round hitting
    a milk jug full of water
    1. Accommodates the zoom capability of your lens.
    2. Is unobstructed.
    3. Will provide the best possible angle for the shots you want. 
  4. Adjust for lighting
    1. Set ISO at a minimum of 400.
    2. Set aperture at f/8ish
    3. Set shutter speed at 1/500, minimum
    4. If those settings are overexposed, increase the shutter speed.
    5. If those settings are underexposed, open the aperture more. f/5.6, f/4, etc
    6. Dolphin Show
      Indianapolis Zoo
    7. If you can't go lower on the aperture, only then is it ok to increase your ISO. TRY not go higher than 800 if you can avoid it.
  5. Set your camera's autofocus point to the one that will work the best for your shots. Conventional wisdom says to manually focus, but whatever, I use autofocus and it works just fine!
  6. Remember in step 1 when I said to get your timing down? This is where that practice pays off. Press your shutter release button half way down justrightbefore your think your shot will take place, then...BAM!!!!! Press it all the way down and, hopefully, you'll have the shot you were looking for! Side note: If your camera has a "multi-shot" or "burst" option now would be a good time to turn it on.
Did I mention I LOVE stop-action photography?

If you have questions please feel free to e-mail me at ande@geminimm.com!

Check me out!
on Instagram: geminimm
on Twitter: @geminimm
on Youtube: GeminiMultimedia


Thursday, August 15, 2013

6 Ways You Can Improve Your Photography

Wanna kick your photography up a notch? Here are 6 things you can do to begin improving your photography skills!

1. Carry a camera with you as much as possible. (I don't mean your smartphone!)
I don't care if it's a point-and-shoot camera or a Canon 5D, Mark III...carry a camera that's built to be a camera with you as much as you can. It's hard to improve your skills when you don't have a camera, right?  Why don't I want you to count your smartphone? BECAUSE IT'S A PHONE WITH A CAMERA AS A SECONDARY FEATURE! Please don't come at me with "But my iPhone takes great photos..." Let me make one thing clear...You aren't going to take GREAT photos consistently with  the camera on your phone and that cute li'l LED light that is used as a flash. You might get lucky every once in a while, but I can assure you that it will have very little (if anything) to do with your skills. Can a smart phone be an arrow in your photography quiver? Sure. Can it be your primary camera? NO! They're good in a pinch, but that's it. Wanna take big boy or big girl pics? Use a device that's built to be camera.

2. Learn where your camera's settings are, what they mean, and how to change them.
I understand that you may not want to become a professional photographer, but knowing this will separate you from most people who hold a camera. It will probably separate you from 90% of "professional" photographers. Of course, if you are going to learn your camera's settings you'll need to learn some concepts and terminology, which brings me to #3 and #4...


3. Learn basic photography terminology.
ISO - The measure of a photographic film's sensitivity to light. On digital camera's it's the sensor's sensitivity to light comparable to that of film. The lower the ISO the higher the contrast and sharper the picture. The higher the ISO the lower the contrast and the photo is less sharp. Low ISO is good for photos where there is little motion and higher ISOs are good for action.
Aperture - Hole or opening that allows light to travel to the film or sensor. The size of the opening is referred to as the "f-stop". The lower the f-stop the more light is allowed in. The higher the f-stop less light is let in. Works in conjunction with the camera's shutter speed and ISO. Also works with focal length to set depth of field.

Shutter Speedlength of time a camera's shutter is open when taking a photograph.  Works in conjunction with aperture and ISO.
Focal Length - Basically the length of the lens.  The longer the focal length the higher the magnification, or zoom. Works in conjunction with aperture to determine the field of view.

To learn how to all of those work together stay tuned to this blog for information on classes offered by Gemini Multimedia!

4. Learn basic photography concepts
Rule of Thirds
Rule of thirds - Divide your viewfinder into thirds and place your subject in one of those thirds. More often than not it makes the photo more engaging. In the photo to the right, notice how Joey (@joeysulipeck) is in the left third of the photo? Had he been centered the picture would not have been as aesthetic.
Bokeh - The aesthetic quality of the out of focus area of a photo.
Depth of Field - The in focus area of a photo
Fill the Frame - Click here for previous post explaining this concept.

Again, look for upcoming information on classes offered by Gemini Multimedia!

5. Find a mentor.
I can't stress how helpful this can be. A mentor is someone who can teach you what they know and nurture you in becoming a better photographer. The BEST thing about a mentor, in my opinion, is the opportunity they have to critique your photos. While you may have family and friends who go ga-ga over your work, a mentor will be honest with you when no one else will. If it's crap, they'll tell you it is. If it's great, they'll tell you that, too.

6. Bookmark this blog/Subscribe to photography magazines/Look to other's photography as inspiration.
Go ahead. Bookmark it now. I'll wait.
5...4...3...2...1...
Ok, now that you have done that here are some links to photography magazines and sites that I like.
Flickr - Goes to my personal account, but you can browse from there if you want
Pinterest - Great site for inspiration.

I hope this list helps you out! Of course, if you have any questions or idea for upcoming blog posts, feel free to e-mail me at ande@geminimm.com!