Wednesday, December 4, 2013

Top Five Reasons To Learn Advanced Lighting Techniques

I LOVE PHOTOGRAPHY!

All aspects of it! I love learning how the curves of my cameras fit in my hands, I love how different lenses are used in different situations. I love the technical settings in my camera. I love the smiles on my clients' faces when they see their pictures. And, most of all, I LOVE LIGHTING!

Natural lighting doesn't always provide me with the look I have in my head. As a result I've learned to use improvised lighting to create the conditions I want.  Eventually, being able to control the lighting in just about any environment became a passion of mine. (For more on my thoughts about the "natural light vs. studio light" debate, click HERE.)

Below is a list of the five most important reasons (for me) to learn studio lighting.

Increased Growth
Inverse Square Law + Camera Knowledge
(For more info on how this pic was taken click here.)

Increased Control
Increased Security
My strobe transmitter failed. Had to go natural light here.
You will rarely, if ever, have to worry about lighting conditions. Granted, you MAY have to worry about power sources and/or space, but we're a creative lot of people so we can make do!  With a good battery pack you can even take your studio lights outside!

Increased Growth
Basic lighting is easy. Creative lighting is challenging and will push you to learn. Hint: Look up the “Inverse Square Law.” It is muy importante when it comes to lighting but unknown to many.


Increased Options
You will have natural light options, studio light options, and combination options beyond your wildest dreams!

Increased Security
If something goes wrong with the weather and it's too dark, you can pull out your lights. If something goes wrong with your lights, you can go natural. Once I accidentally toggled my camera to shoot high quality .jpg instead of RAW for about 50 pics at a wedding. Because of my lighting usage the HQ .jpgs were fine with very minimal tweaking. No worries for my client or me!

Increased Marketability
This wraps up the previous four points. When you can pull off perfectly exposed shots in adverse conditions, or pull off shots that pleasantly surprise your clients, you get to make more money!  We all like more money, don't we?

To contact Ande for your video/photography needs:
(901) 213-7890
ande@geminimm.com

Monday, November 4, 2013

My Pics From Different Angels...um, I mean, Angles!

I've always always believed in having some fun with what you do for a living.  Being a photographer, many people don't see it as work. They see pics of interesting people doing interesting things. What people don't see are the not so glitzy things that pay the bills such as how to videos, corporate head shots, crying children. In order to keep a passion from becoming a job, you gotta have fun with it.

Sometimes I do that by hanging out at the park or experimenting with lighting.  Last week I spent some time at Bartlett United Methodist Church (Where I attend) and took some pictures of the church from angles MOST people will NEVER see.

I hope you enjoy the tour!

Pew rails

View of pew racks from balcony.

The steep stairs leading up to the rooms where the organ pipes are.

This ladders goes up a long way. Into the church's steeple.

Some medium sized pipes for the organ.

Itty bitty pipes for the organ.

More itty bitty pipes.

View of pews from pipe room. Focused on pews.

View of pews from pipe room. Focused on mesh.

Pneumatic controls for organ chimes.

Large organ pipes.

Bells that are controlled by the organ.

Not sure what these are called, but they are organ controls.

Organ pedals.

View from catwalk about 70 feet up.

View from cat walk. On the other side of that is a 70 ft. drop.

More catwalk.

View from sound booth.

Keystone from when current chapel was built. BUMC was once called the "Methodist Episcopal Church South"

Two chimneys that are no longer functional.

Tuesday, October 8, 2013

How to Dress for Your Family Photo Session

It's getting to be that time of year again...Thanksgiving, Christmas, the holidays, fall colors, and time for family portraits. Hard to believe isn't it?

It's always boggled my mind that so many people get so stressed out this time of year.  The holidays are time to get together with family and friends to have fun and celebrate.  Family portraits usually end up being cherished for years to come, but they can also cause a great deal of stress.  While I can't help you get rid of your holiday season stress, I CAN help alleviate some of the stress that goes into planning a family portrait session.

WHAT TO WEAR
Cool colors or warm colors, but don't mix the two.  Parents and older children should wear more neutral colors while letting the kids get more crazy. I personally love solids, but patterns are ok as long as they are not trendy and could date the picture. Logos are a no-no.  One wardrobe change MAX!

Wear something you like. Something that you feel good in. Something that fits and is comfortable. You will be more confident in the way you look and it will show through your smile!

Try not to dress everyone in the same outfit. Kids will roll their eyes and it will take away from everyone's individuality.

MAKE UP
Women - Mascara, blush, and lipstick at a minimum. Use an amount you're comfortable with, but don't overdo. Make sure you check teeth for stray lipstick.
Men - A little concealer if you have dark circles under your eyes. Brush your eyebrows, trim your earhair, and be careful shaving!  A little secret...I wear concealer for my pics. SHHH!!!! Don't tell anyone!  ;-)

HAIR
How you normally wear it is best. If you're going to have it styled do it the day before so it has some time to relax.

ACCESSORIES
Remember how I said one wardrobe change earlier? Bringing some fun accessories like hats, scarves, boots, etc. They will add some variety and give the appearance of a wardrobe change.  Also, if you have small children you should bring a favorite toy to help keep their attention.

Bring a blanket to sit on so you can sit on the ground without having to worry about any kind of stains.

LOCATION
Now this is up to you. I can shoot in your home, in a studio, or outside. Just make sure there is enough room for everyone and my studio lights.  I LOVE to shoot outdoors, especially when the weather is nice and leaves are changing color. If you don't know of any locations, please check out my post ANDe's Top 5 Places to Shoot In the Memphis Area.

TIME
The best time to shoot outdoors is usually before 10AM and and hour or two before sunset.  I can shoot at anytime of day, though.  For indoor pics we need to coordinate around the naps of small children.

That's it! Consider your family portrait session planning to be STRESS FREE!!!!!

Now all you have to do is call me at (901) 213-7890 or e-mail me at ande@geminimm.com to schedule your appointment! Deal? Deal!

Wednesday, September 11, 2013

Red Eye: It's Not Just a Late Night Flight!

Before I start I want to let you know that The Awesomeographist now has an unofficial "editor." Since I most often write this between 12:30 a.m. - 2:30 a.m. I am often bleary-eyed when I proofread.  Yesterday I asked Heather, the editor, what I should write about since I am beginning to experience a wee bit of writer's block. She said, "How about dealing with red eye?"  So...here goes!

It's no secret...a tell tale sign of speedy photo posting is red eye.  Not bloodshot eyes, but the kind of red eye that causes people to laugh and say things like, "OMG! She looks like she's possessed!"  Quite honestly, I've heard that phrase so much I want to throw up.  Seriously, I'll be right back...

Ok, I'm back, and I want to tell you how to a) avoid red eye and b) correct it if it happens.

Before I start I need to explain what red eye actually is. According to Wikipedia, it is the "common appearance of red pupils in color photographs of eyes. It occurs when using a photographic flash very close to the camera lens (as with most compact cameras), in ambient low light."  The flash occurs so fast that it is actually reflecting off of the back of the eye because the pupil doesn't have time to close.  Now that we know what it is we can plan on avoiding it before a photo is taken.

RED-EYE REDUCTION MODE (RRM)
Not all cameras have this, but if yours does by all means, enable it. RRM will either turn the flash on for a couple of seconds or flash 3 to 5 times to cause your subject's pupils to constrict.  This minimizes the amount of flash light that will reflect back to the camera.

REPOSITION YOUR SUBJECT
This may not always be an option. You can move your subject from an area of low light to one of brighter light. This will cause the pupils to constrict and, hopefully, reduce the amount of red-eye.  Any red-eye left from having the RRM turned on should be further reduced by doing this.

ANGLES ANGLES ANGLES
Subject's eyes cut at an
angle, eliminating red-eye
in a dark environment.
If you're not taking posed shots, make sure you are at a slight angle to your subject's eyes when you take the picture. There is very little light that will make it in the pupil and even less will be reflected out.

Hopefully red-eye is no longer a problem. But, if it is, try the following:

SMARTPHONE APPS
Of course this will only work if you take the photo with a smartphone.  There are some good apps out there, too many to list. Checkout Google Play or the iTunes store.

PHOTO EDITING SOFTWARE
After you get home from your event, you should immediately connect your camera to your computer and transfer your photos. Then you can open them in your photo editing software and remove the red-eye. You camera probably came with software to do this.  If it didn't there are free titles out there. GIMP is a good one. I prefer Serif products.

PRINT IT OUT AND USE A BLACK MARKER (Last Resort)
This is old school but it works if you do it right. Simply take a black permanent marker and lightly draw over the red pupil. Voila! No more red-eye. Just be careful to not over do it. The photo will look unnatural.  You may also need to shop around for just the right marker. Since prints aren't as popular as they used to be the markers specifically made to do this can be more than $25!

That's it! I hope those tips help!  If you have any tips or suggestions of your own I'd love to hear them!  Simply e-mail me a ande@geminimm.com.

Tuesday, September 10, 2013

4 Reasons to NOT Hire a Professional Photographer/Videographer

When I first began marketing my photography as a professional service, I wanted to be hired for any type of shoot.  You know, the typical things: Weddings, retirement parties, corporate events, modeling shoots, etc.  I also wanted people to hire me for smaller events like kids' birthday parties or any other small event you can think of.  It didn't take me long to realize that not every event warrants a professional photographer.  Here are four reasons you may not need a pro:
  1. Your event is small.  You're event may be important, but it just may not warrant hiring a professional photographer. Point-and-shoot cameras and cell phones may work great!  EXCEPTION:  IF you have a gathering of people who rarely get together (out of town family and friends) and you want portraits done, by all means, hire a photographer for that once-in-a-blue-moon portrait opportunity!
  2. "Just ok" is good enough.  I don't mean to sound condescending here, but sometimes "just
    ok" is exactly what is needed. If having high quality photos is not that important to you, why would you spend the money?  Not every event or occasion needs perfect lighting or high quality photos. Company picnics are a great example. People wear clothes that they will be comfortable in while enduring hot Summer temperatures. They get sweaty and sometimes dirty. A regular ol' snapshot will do just fine. 
    EXCEPTION:
    If there is corporate programming at the picnic, you may want to consider hiring a professional to cover any speeches given by management and executives. Or, if awards are to be handed out to employees.
  3. Your event is going to be covered by media. If you've sent out press releases to media outlets and have verification that the media is going to cover your event, you more than likely won't
    need your own professional photographer. Many newspaper/magazine photographers are
    freelance and they know exactly what they are doing. If you're nice, they may even send you the pics they take of the event. At a minimum, you will be able to link to the online story that the media outlet publishes.
    EXCEPTION:
    If you have specific needs/wants for coverage, you should hire your own professional. Money = control, at least to a certain extent.
  4. You don't have the budget.  Professional photographers/videographers bring significant skill, knowledge, and high quality equipment to the table. Therefore, we charge a premium for our services.  If your budget does not allow for that level of professionalism, then hiring a professional simply is not an option unless you are willing to cut expenses in another part of your budget. 
    EXCEPTION:
    If you have a friend who is a photographer and owes you a favor, or, if you have a service/product you offer as a "trade for service" that just might land you a professional for little or no monetary expense.
Obviously, if you have the money and desire for professional quality photos and/or video, by all means hire a pro!  Just make sure your hire the right pro for your event!
Hint Hint ;-)
(901) 213-7890
ande@geminimm.com

Friday, September 6, 2013

Q&A with Joey Sulipeck, Fox 13 Memphis Chief Meteorologist and iPhoneographer

Joey Sulipeck
Chief Meteorologist at Fox 13 in Memphis, TN
Follow Joey on Twitter and Facebook
I know, I know...If you're one of the millions who read this blog daily (heh heh heh), you know I'm bothered by two things: people who don't return their shopping carts AND the dependence on iPhones as a primary camera.

The primary reason is iPhones don't have optical zoom. I've seen decent shots where an iPhone was used but the digital zoom was not turned on. When the digital zoom is used, however, the shot can be ruined.  And that is not just an issue with iPhones, it's an issue with any piece of photo/video equipment no matter how "high-end" the device is.

Shortly after I started working the graveyard shift (as a video editor) at Fox 13 in Memphis, a friend of mine said I should introduce myself to the station's chief meteorologist, Joey Sulipeck, which I did.  It didn't take long before we realized we share a love of photography.  We have had some great discussions on viewing photography as art, subject preferences and equipment recommendations.  A couple of weeks ago we had lunch and I went off on a tangent about how I think people are putting too much faith in their iPhones as cameras.  Joey responded in defense of the "iPhoneographers." We were having an evenly matched debate until he started showing me some of the pictures he had taken with his iPhone.  I must admit...at that point he began to sway me.

As a result, I asked if I could interview him for this blog because, honestly, I was blown away by what he does with his iPhone's camera. I was also impressed by his technique. He understands that accessories and apps are needed to make it a truly effective substitute for a camera.

Enough of the background...let's dig in!
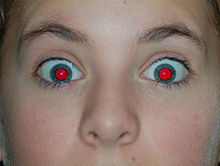
© Joey Sulipeck
The Awesomeographist:  Joey, what inspires you? What is your favorite subject to photograph?
JoeyI LOVE capturing real moments.  Photos that make you stop and study, reflect, think, marvel.

The Awesomeographist:  I know you have some nice DSLR equipment, but it seems that your camera of choice is your iPhone. How has your iPhone impacted your photography?
Joey:  I've owned decent cameras for many years, but the iPhone changed my shooting dramatically.  Since I ALWAYS have it with me, I can ALWAYS capture a moment that appears before me.  And even more compelling is that I can adjust it, enhance it, be creative with it in a million different ways, and instantly share it across any platform I choose.  What good are beautiful photos if they're stuck forever on a memory card because I don't have the time to sit and download massive files?  I'm now SURROUNDED by my images, and can instantly access a huge catalog of past shots.  It's changed everything.

The Awesomeographist:  What determines whether you use your iPhone or your DSLR?
 Joey: I use my iPhone 99% of the time to shoot now.  If I have a special pre-arranged shoot (model shots, family photo shoots) I'll use my DSLR as it's a professional camera.

The Awesomeographist: Do you have a backup/disaster strategy should your phone break?
Joey: If my iPhone breaks.....I'll run and get a new phone.  And I know this for sure:  the next model will have an even better camera.

The Awesomeographist:  Do you use photography in your career as a meteorologist? If so, how?
Joey:  I take pictures of weather events all the time now.  Just as revolutionary has been OTHER people with iPhones to take weather pics and show them to me instantly.  Take a moment to let that sink in:  for the first time in history, we're able to SEE in REAL TIME the weather that's occurring from multiple viewing angles.  That has a massive ripple effect for studying weather and how it affects us.
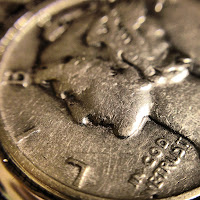
© Joey Sulipeck
The Awesomeographist:  If you could choose any location and subject in the world to photograph, where and what would it be?
Joey:  There's no "one" location I'd like to shoot because if I stop and look around, I see fascinating things in every single place I'm standing.  Sometimes it's wide open and obvious....sometimes it's a super-close up macro shot.  That can often turn the mundane into the fascinating.


The Awesomeographist: What role, if any, do you see for film in the next 5 years?Joey:  The future of film is dim.  It's just not practical:  time consuming & expensive is not a good combination.  I think there will always be purists who will prefer and use it....but it will be a very small percentage of people.

The Awesomeographist: Describe the coolest photo you've ever taken...
Joey: Picking a favorite photo would be like picking a favorite child!  And what's a "favorite" of mine might not mean ANTHING to someone else.  Photography is an art, and art is personal.  I love that about photos.
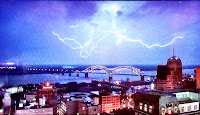
© Joey Sulipeck
The Awesomeographist: Do you have a favorite photographer? Whose work do you most admire?
Joey:  I don't have a favorite photographer, and I like that.  Here's why.  As a kid, I wanted to be a professional photographer with National Geographic.  I realized early it was never going to happen because I couldn't afford a camera, or more importantly, the film processing.  But now, ANYONE can be a photographer!  And quite often, the most dramatic photos come from unkno
wn shooters who happen to be at the right place at the right time and (because they're all carrying smartphones) they just happen to have a camera!  I love that.

The Awesomeographist:  Of all the cameras you have owned, which one do you favor the most?
 Joey: Of all the cameras I've had?  It's ironic, because I've invested THOUSANDS of dollars over the years.  But now, my favorite?  My simple iPhone.  Just too easy and fun to use with remarkable results.
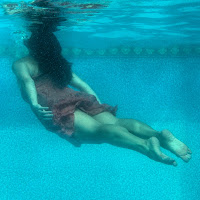
© Joey Sulipeck

Thursday, September 5, 2013

The FIRST Step To Becoming A Professional Photographer Is...

I'm ashamed to say that when I first made the jump into the professional photographer world I got a little arrogant. I mean, how dare someone else even think about becoming a professional photographer! Just because YOU have a camera and a passion for photography (like I do) doesn't mean you should pursue it (like I did)! Go ahead, call me a hypocrite if you want...I deserve it. At least I did at the time.

One of my mentors, Jay Johnson (right), and me
As long as I can remember I've had a desire to help people. I know that may sound contrary to my statement above and I think I'll credit it to my upbringing as I have great, loving parents.  What does THAT have to do with taking your first step to becoming a professional photographer? Well, I want to help YOU and, if you're serious about professional photography, your first step needs to be to find a mentor.

Not just any mentor, but a "M.E.N.T.O.R."

Mature - Your mentor needs to have a level of maturity you are comfortable with. I'm a funloving guy. Joking around and keeping things light helps me stay sane. However, when it's time to do business I'm serious. If you're looking at photography as a means to make a living, your mentor needs to appreciate that and take you seriously.

Engaging - You don't want to be bored. While part of your responsibility in this relationship is to stay focused and learn, your mentor has a responsibility to keep you engaged. Not making you do silly things without a point. Your mentor doesn't need to just recommend article to read. He or she needs to help you apply what you've read. Big difference.

Nurturing - Mentors need to help you grow.  This characteristic ties in to all others.  You want to be a photographer at a professional level. Your mentor needs to nurture that. Help you along the way.

Teaching - Learning is the motivation behind this whole relationship, is it not? What good is a mentor if you have questions and are told to just figure things out on your own?  I'm not saying that approach has no value in certain circumstances, but if your mentor is not an effective teacher, why are you even there?

Open - By open I mean open with you. If you take some of your photos to your mentor for review, your mentor needs to be open and honest with you about his or her opinion. Not only does his opinion need to be stated, but the reasons behind the opinion as well.  If the picture is awful, you need to know why. If it's great, you need to know why. This is when you need to have thick skin and your mentor needs to not care (too much) about your feelings. You WILL NOT GROW as a photographer without this type of communication.  I'm sorry, but "Facebook likes" aren't an acceptable form of critique here.

Respectable - You will want a mentor who communicates openly with clients about ability, pricing, style, products, time frames, etc.  Photography is fun and cool, but when people hire you they will be hiring you to capture something that is an important milestone in their lives with a lot of emotion attached to it.  You are not just there to take pictures, you are there to capture a moment.

Once you have someone in mind who can meet those needs, reach out to them. If you're not comfortable reaching out yourself, maybe ask someone else to reach out for you. I say "maybe" because I personally think you should contact your potential mentor on your own.  If/when you jump into the pro world you're going to be both your marketing team and your sales force. You need to get used to talking to people you don't know. The worst thing a potential mentor can say to you is "no." If that's the case, move on and don't take it personally.

Another thing, expect a little trade in this arrangement.  Your mentor will be passing on skills and knowledge that have taken a significant amount of time and money to learn.  Be prepared to assist your mentor in some way without any expectation of monetary compensation. You will learn an invaluable amount of information.

The photographers I know, myself included, would be flattered to be asked to be a mentor.  If you have questions about photography or are looking for a mentor please let me know. My e-mail address is ande@geminimm.com and my phone number is (901) 213-7890. I'll help however I can!

Wednesday, September 4, 2013

Three Easy Steps to Basic Astronomy Photography

Answer: The Moon and stars.
Question: What is ANDe taking a lot of pictures of these days?

I don't know what it is about taking pictures of the night sky, but I find it very soothing and relaxing. I don't know why, I just do. It's one of those things that seems so complex, but once I learned about it, it's quite easy. I've always said taking pictures is taking pictures...meaning if you know how to take pictures of one type of subject it isn't hard to take pictures of another type of subject.  The only exceptions would be people (you have to learn how to pose them) and animals (if they don't stay still).  Other than that all of the concepts are the same.

Anyway...back to the night sky. One of my favorite lenses is the Canon 70-200 f/2.8.  The glass is crystal clear and with my crop sensor Canon 60D the effective focal length is 320mm. I can get good clean photos in low light, so it was a natural curiosity of mine to capture the night sky.  Now that I've been giving it a go for a little over a week, which in DSLR lingo makes me an "expert" (Yes, that's a joke!) there are some invaluable things I've learned as a basis for photographing the night sky.  I'm going to share them with you!

The Looney 11 Rule - This rule has become invaluable to me in photographing the moon. Earlier I joked about being an expert at this, but the following has been said about my moon photography:
Use the "Looney 11" rule to
photography the moon.
"I get that you are a professional and all......but the fact that you captured this image is a bit mind boggling. It looks like something from NASA" and
 "Wow Ande, I am gobsmacked. What an INCREDIBLY BEAUTIFUL photograph!"


Again, I'm not an expert here, but this rule combined with some tweaking on my part, helped me out tremendously here!  Click here for details on The Looney 11 Rule.


Orion
CLICK TO ENLARGE
Rule of Thumb for Photographing Stars - I have seen formulas on how to set the maximum shutter speed ranging from 250/focal length (fl) to 1000/fl. Those formulas will vary based on aperture and ISO. The best rule of thumb I could find is this from Nikon's website:
"A good starting exposure for most star shots is to use the widest aperture on your lens, expose for 20 seconds, increasing the ISO as needed for a good exposure."
That gives you an excellent starting point. Go from there!


Google Sky Map - This app is AWESOME for finding specific stars, constellations, and the moon. I know, the moon is a big duh, but it's difficult to see when it's a "new moon".  With this arrow in your quiver and a wide enough lens you just might be able to get a photo of your favorite constellation in the middle of a big city with lots of lights! You'll need editing software like Lightroom to clean up some of the ambient light, but it's amazing what you can get without being in the middle of nowhere!


I hope that helps! Please feel free to comment and share any tips you have about photographing the night sky!


Tuesday, September 3, 2013

The "Nifty Fifty" and Why it's My "Go-to" Lens

If someone were to challenge me to take photos for them with the condition that they weren't going
to tell me what the subject was or what the setting would be, I would choose a 50mm prime lens.  Specifically, the 50mm f/1.4.  Here are the reasons why...


  1. It's reasonably priced. For around $350 it's a little more expensive and more sturdy than the 50mm f/1.8 ($119) and significantly less expensive than the 50mm f/1.2 ($1,619).  The while the f/1.8 if Canon's lightest lens, it also (to me) feels like it's cheapest. The f/1.2 is "L" glass and the lens is solid, but it is a bit heavy. The f/1.4...it's juuuust right said Goldilocks, and it's at a good price point.  If something happens to it and it's out of warranty it's not too terribly expensive to replace.
  2. It's a good focal length that doesn't require a lot of moving back and forth to frame the picture.  Granted, in tight quarters things can get tough, but that generally doesn't happen. You may be thinking that the 24 - 70mm f/2.8 may be more versatile, and I would agree in certain instances, but in this situation I have no idea what lighting is going to be like and I want a lens that will perform better than the 24 - 70mm in low light.
  3. It's lightweight. Carrying a camera body with battery grip, speedlight, and a lens attached can get heavy, especially if it's the 24 - 70 f/2.8 or the 70 - 200mm f/2.8. This lens is so light compared to those lenses.
  4. It's versatile. You can take great action shots in low or bright light. Have you ever seen a sign that says "No flash photography?" With this lens you can laugh at those signs! With a max aperture setting of f/1.4, I can pull of some astounding bokeh effects in camera without having to edit a thing. Sometimes the pictures have almost a 3D look to them. One caveat...taking a picture of people can get very trick lower than f/2.2 as you can focus on their nose and their eyes will be blurry. Be careful there. 
  5. It's small. It's easy to add to almost any camera bag. It can even fit comfortable into the side pocket of cargo shorts or pants!
Do you have a "go-to" lens? If so, tell about it in the comments below. I'm always fascinated as to which lenses other photographers prefer and why.
No flash, low light
50mm
No flash, low light, action
50mm

Monday, September 2, 2013

Memory Cards...

I wanted to title this post, "Memory Cards...Is Bigger Better or do Great Things Come in Small Packages?" but the length of that would've been lost on the page. But seriously, is it better to use larger capacity (32GB and up), smaller capacity (8GB or less), or in between (16GB)?

First off...there are some common sense things you should do when using memory cards:
  • If the card is new, format it in the device it is going to be used in BEFORE you use it for the first time.
  • Even if it is not new, format the card with the device you are going to use it in. Don't erase the card and slap it back into a device for use.
  • If you are going to use a card in multiple devices, format WITH the device it is going to be used in.
  • Don't reuse a card if you've had problems with it.
  • Copy, don't "move" your images from the card to your hard drive.
Those are just some basics, there are more and if you're interested simply do a Google search for "memory card best practices".  That brings me to the debate...larger capacity cards, smaller capacity cards, or somewhere in the middle?

The vast majority of "best practice" tips say to use a smaller capacity card, such as an 8GB or 4GB card. If you're like me, you're asking "If that's the best practice, then why do cameras have the capability to read cards larger than 8GB?"  That's a valid question.  The reasoning behind this best practice is insurance. If you fill an 8GB, switch the card out, and the second card fails, you still have the images on the first card. However, if you use one 16GB card and it fails, you've lost ALL your images.  That is a valid point.  So what to do?

Well, do you want to know what I do? (If you don't, I'm going to tell you anyway and wonder why you're still reading at this point!) I use a 32GB card in each of my cameras AND I keep 32GB cards waiting just in case they fill up.  Yeah, I know this flies in the face of what "experts" say, but let me explain why.
  1. I have used "flash" memory (The technology behind memory cards) longer than most people have. Being that my background is in information technology I've had access to it when it was cost prohibitive for the average consumer to own. I've used memory cards/thumb drives since large capacity was considered 64MB (not 64GB) and guess what???? I've NEVER had a failure! Not one failure since the early 2000s. The cards I  own from then STILL work, it's just I don't use them.
  2. Memory card technology is BETTER than it ever has been in the past.  Yes, if you're a photographer you've depended on memory cards to work when the technology was less reliable, even at lower capacities. Think about that and let it sink in...
  3.  The main reason I like the higher capacity cards...I don't have to change them out as often and the camera can write to them at the maximum speed the camera can write. Two bottle necks that eat time are eliminated.
Now, there are a couple of things I do to ensure this decision doesn't come back to haunt me.  When I get home from a shoot I IMMEDIATELY transfer the images to my hard drive and copy to an external hard drive. Secondly, I don't reuse the cards more than a few times. When you think about it, those are good ideas for any size memory card.  In fact, I've even thought about purchasing brand new memory cards for each and every shoot.  Why not build it in to your pricing?


Those are my thoughts on the matter. I make no guarantees and want to make sure you know that any decision you make regarding the use of memory cards/flash memory is your own decision and I'm not liable. I just want to make my opinion known that flash memory is more reliable now than ever and stressing about it's dependability is not necessary.

Friday, August 30, 2013

Sometimes I'm the One Who Needs the Repair!

There is nothing I hate more than taking a picture that looks great on my camera's display only to find out it's a little bit blurry on the big screen. A little bit blurry = TRASH to me, even if it's the teensy tiniest bit. Now, don't get me wrong, I'm talking about where my subject is blurry, not bokeh.

So you're having issues with blur? See if this helps...

Decrease your ISO if possible
Anything over ISO 400 generally produces some kind of "noise".  The new sensors have greatly minimized noise over ISO 400, but it's still there. Try reducing your ISO to 100 or 200 and see how that works.


Check your shutter speed
If you're shooting by hand I don't recommend anything lower than 1/80.  Shutter speeds lower than that can make your shots blurry due to your hands being unsteady, your heartbeat, and/or your breathing. If you're using a zoom lens your shutter speed needs to the inverse of your focal length to minimize shake. For instance, if your focal length is 150mm your shutter speed needs to be at least 1/150. (1/240 if you're using a crop sensor Canon or 1/225 if you're using a crop sensor Nikon.)


Check your aperture
A wide open aperture greatly affects depth of field. If your aperture gets lower than f/2.2 your camera is getting a very specific point in focus but the depth of field is so narrow that some parts of what you want to be clear will be blurry. Simply use a smaller aperture setting until you get the result you want.  You may also need to adjust your shutter speed and/or ISO.

Use a tripod
Duh!


Buy reading glasses
I was shooting a wedding and every single one of my pictures looked blurry on the camera screen. I glanced down at my screen with my arm fully extended and the picture was in focus. That moment was when my farsightedness became apparent.


LASTLY...
Your camera MAY have a focus issue. If you're using a DSLR it can be an issue with your camera body OR a specific lens. Please follow your manufacturer's instructions on how to have your camera serviced.

 The reading glasses thing...yeah, that made me feel like I am getting older!

Thursday, August 29, 2013

Need a Black Backdrop in a Pinch? Try this...

I posted this picture on my personal Facebook account with the following question:

Where was this photo taken?
A - My living room with a black backdrop
B - In my driveway in the middle of the afternoon, no backdrop
C - Studio with black backdrop
D - In my driveway at night, no backdrop


Since most of my close friends know I don't have a brick and mortar studio they guessed either A or D. My photography contemporaries guessed A, C (Sometimes I use someone else's studio), or D.  I'd say D was the most chosen answer.  The correct answer, however, is B.

The picture was taken at around 2pm on a sunny day while standing on my driveway. You are seeing the photo as it was taken with the exception of a slight crop. Don't believe me? Let me tell you how I did it!!!!!! NOTE: Depending on the time of day speedlights may/may not work.
  • Step #1 - Place camera in manual, or "M" mode.
  • Step #2 - Set shutter speed to 1/250. Why? Because you're likely to run into flash sync issues if you use a flash at higher shutter speeds.
  • Step #3 - Set your aperture very small, like f/20. This photo was taken at f/32.
  • Step #4 - Set your ISO to 100.
  • Step #5 - Take a picture without your subject. If the picture is not completely black you will need to make some adjustments. The first adjustment to make is make your aperture narrower.  If that doesn't work then increase your shutter speed, but just barely.  After this is done you should have achieved the completely black photo.
  • Step #6 - Place your subject where you want them.
  • Step #7 - Place your strobe (I used an Alien Bee B800 at full power) where necessary and make the light as narrow as possible. I used a cone, but you can used an unextended umbrella to help direct the light only on your subject. You'll want to do this so the light won't reflect off the ground or any object in the background.
  • Step #8 - Take your picture. It should be ready to go right out of the camera!

In the photo above I had to increase my shutter speed to 1/400. The telltale sign of a flash sync issue is a dark band of varying sizes along the bottom of the picture. Remember earlier I said the only edit I made was a small crop? The crop was to get rid of that dark band. Other than that, the photo is what I took right out of the camera, no edit!


This same concept will work indoors, too. Light direction and focus will be even more important, however.

I hope this little trick comes in handy if you ever wish you had a black back drop. Personally, I think it's quite cool...

Wednesday, August 28, 2013

Bokeh - Yeah, It's a Weird Word

Pronounced BOW-kuh...it's a weird word to say. It was a weird word to hear the first time I heard it. I remember acting like I knew what it meant, excusing myself to go to the men's room, pulling out my phone, and doing a Google search for it. When I read the definition I knew EXACTLY what it was, I just didn't know it had a name. I just thought it was "blur."  I was only half right.

Bokeh used to subtly convey what subject is doing.
According to Wikipedia, "bokeh" is "aesthetic quality of the blur in out-of-focus areas of an image." So, it's not just the blur, but how good the blur looks. Another way to put it...all bokeh is blur, but not all blur is bokeh. Bokeh enhances a photos appeal and is more engaging to the viewer, whereas plain ol' blur might just be a poorly taken picture.


Bokeh used to make unsightly background more appealing.
Bokeh isn't something that just happens unless you don't know what you're doing. It's something very intentional. Take the photo above for example. @justlarry LOVES Memphis, TN. We were on a shoot together and he picked up a copy of Memphis magazine. While I wanted Larry to be the primary focus of my photo, I wanted his love of Memphis to be the secondary focus. And his red nose to be the tertiary focus (Ha!).  Bokeh can also be used to blur out ugly backgrounds. That might not sound like "bokeh" as the background is ugly, but remember, bokeh is the aesthetic quality of the blur, NOT what is actually blurred. You can literally take something unsightly and use it to your advantage.


By now you're probably wondering how you can make this happen intentionally...well that's what I'm here for. Take notes...or bookmark this page!

Before I move on I feel I must also touch on "depth of field." Depth of field is the area of the photograph that is in focus. It's affected mainly by two things...focal length (effective length of the lens) and aperture setting. The lower the number (the more open the aperture) the narrower the depth of field.  Combining a long focal length with a wide aperture can give you the narrowest depth of field with a lot of blur. A short focal length with a small aperture will cause just about the entire photo to be in focus. Ok, moving on...

If you're using a point-and-shoot:
I'm not going to lie, you're going to be a little limited here. However, it's not impossible to pull off. You'll want to zoom in as far as your lens will go (maximum focal length) and NOT use digital zoom. Focus on your subject and take the picture. If the blur is not where you want it, try setting your camera to it's macro setting. If that doesn't work look to see if your camera has an "aperture priority" setting. It's "Av" on Canon models and "A" on Nikons. Once you set your camera to aperture priority you'll want to open the aperture as wide as you can, which will mean a small f/number. Start of with an ISO of 200 and shutter speed of 1/80 if you're indoors. Adjust settings to taste. You're just simply going to have to play around with your settings, but it CAN be done.

If you're using a DSLR:
  • Shoot in manual mode.
  • Use maximum zoom. (If using a prime lens, this won't be an option.)
  • Set aperture to wide setting that will allow for a good depth of field. For instance, if you're using a 50mm, f/1.4 lens, setting the aperture to 1.4 might make someone's nose in focus but the eyes will be blurry. Take multiple shots and tweak your settings.
  • If you are still not getting the desired effect, try moving closer to your subject if possible. Longer focal lengths at short distances will create a greater blur.
  • Pay attention to ISO. I can't help you much here...you're going to have to play with it based on your available light.
That's really about it. You're going to have to experiment. Eventually, it will all click and you'll be able to pull off the desired results whenever you want.

If you have any questions about bokeh, or any other photography/video topic, please e-mail me at ande@geminimm.com.

Remember, you'll smile when I flash you!